Hello, my name is Clifton, and I am a legal boutique medical cannabis grower in Oklahoma. I specialize in all organic Lanrace Cannabis. I am a one-man operation, lots of reasons for this, the main one is quality control, I want things done exactly the way I want. The market here is flooded at the time being, with zero support from the state, and all they do is pass more and more regulations and fees. I and many other small growers feel they do this to push us out of existence to make way for big pharma and large commercial grows. I do not know that with 100% certainty but it sure feels like it. I do know for a fact the State of Oklahoma, does not support the small grower like they said they would.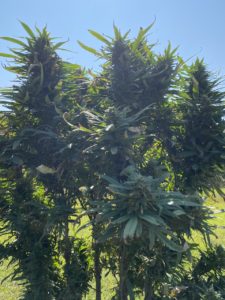
So why is this important? or why should you even care? The reason why you should care is I can not afford to do anything that would have a negative impact monetarily on my business. So the suggestions I share are proven and the most cost-effective to offer the best return on your investment with a harvest of high-quality flower.
Cannabis Cost Savings
Here is why effective cost-saving methods are critical in Oklahoma and may be applicable to your state as well. In any event, if you grow commercial or for yourself I want to help you grow the very best you can, so lets start unlocking your plants potential and have some fun doing it!
The cost of good Top Shelf Cannabis is $1000 a pound here and the average is closer o $700 a pound. By the time you pay the $250 to $350 for the full panel test you really do not have much room for error on your profit margin. While I do not grow for the money, I grow for the love of the plant, I do not want to donate my money to my grow. I still need to make a little for my time, effort and hard costs. I do not want to go in the hole
My philosophy is to share what knowledge and experience with everyone who wants to grow Top Shelf Cannabis.
So lets get the legal stuff out of the way. Follow all State and Local Laws where you live, these tips and suggestions are not an invitation for you to violate any state or local laws.
My knowledge base (and I do not pretend to know everything) is based on my Grandmothers knowledge of how she grew her garden, moon phases, signs, personal experience, and working with more experienced veteran growers. I hope you will gain some new tools and insight to improve your finished flower. In this series of articles I will present each step of the grow process from starting the seed to curing.
Cannabis Genetics Are Important
The most important thing in my opinion is solid genetics. Sure you might get a good plant from a friend or in a bag and I have seen times that any seed is a good seed. However today I do not feel that way. You need stable strains that will produce what you want. If you look at hybrids I recommend staying away from any seed that is below an F7 generation. The F7 means it is the 7th generation of that strain and is accepted that it is a stable production strain with no surprises.
So before you buy any seeds, take the time to look at the background of what you are looking at. I personally look in order at the following, mold resistance, pest resistance, tolerant of high temperatures, smell (strong vs weak), yield and THC level. The last thing and a very important step is to pick a strain that grows in your latitude band. My grow is located at 36.5 degrees latitude. I look for stains worldwide that grow three degrees north and three degrees south of that. By doing this the chosen strain is used to the lighting conditions and should do well. I grew some Red Afro with is a strain that is a Swazi based hybrid, so it is a tropical sativa. It did well, but did not reach it’s genetic potential, because we on get 6 weeks of fourteen hours a day of usable light. This is simply not enough days of the required light the plant needs. It was a beautiful plant and a great product, however, it produced very little. It had a peppermint smell when you were trimming it, that made your nose and eyes water. Fantastic sativa but not enough to be commercially viable.
Outdoor Weather, THC, and Terpenes
In Oklahoma, powdery mildew, and bud rot are serious problems, so if you don’t start with a little something in your corner you are going to have major problems. We also have high humidity daily and summer temperatures over 100 F for about a month and I have seen spikes over 115. The rest is pretty self-explanatory. The THC level may throw you a little bit of a curve, but let me explain briefly. THC is not the main factor in producing high quality in my opinion, it is the terpene level. High THC with low terpene levels, to me is like eating a high-quality steak, that has not been cooked and seasoned correctly, you can tell it’s a steak but you are not really impressed by the flavor or experience.
So in my opinion you need cannabis to have a decent amount of THC with 5% or higher terpene levels.
I think of terpenes as the spice to get the meal to perfection. If you disagree with me, that’s fine. I still wish you great success in your growth. This gets us back to genetics, if you’re wanting to grow cannabis with high terpene levels you need to find those strains that are dank. You can’t take a stain that has little smell and turn it into a high terpene plant. It is genetically impossible. Your responsibility as a grower is to unlock the genetic potential of each and every plant, while that may sound cliche, it’s not. Every plant has a different potential even among the same stain. Think about your brothers and sisters, same parents but each of you have different traits, each with different genetic potential. Again, I am going to offer suggestions and techniques I use to try unlock that genetic potential.
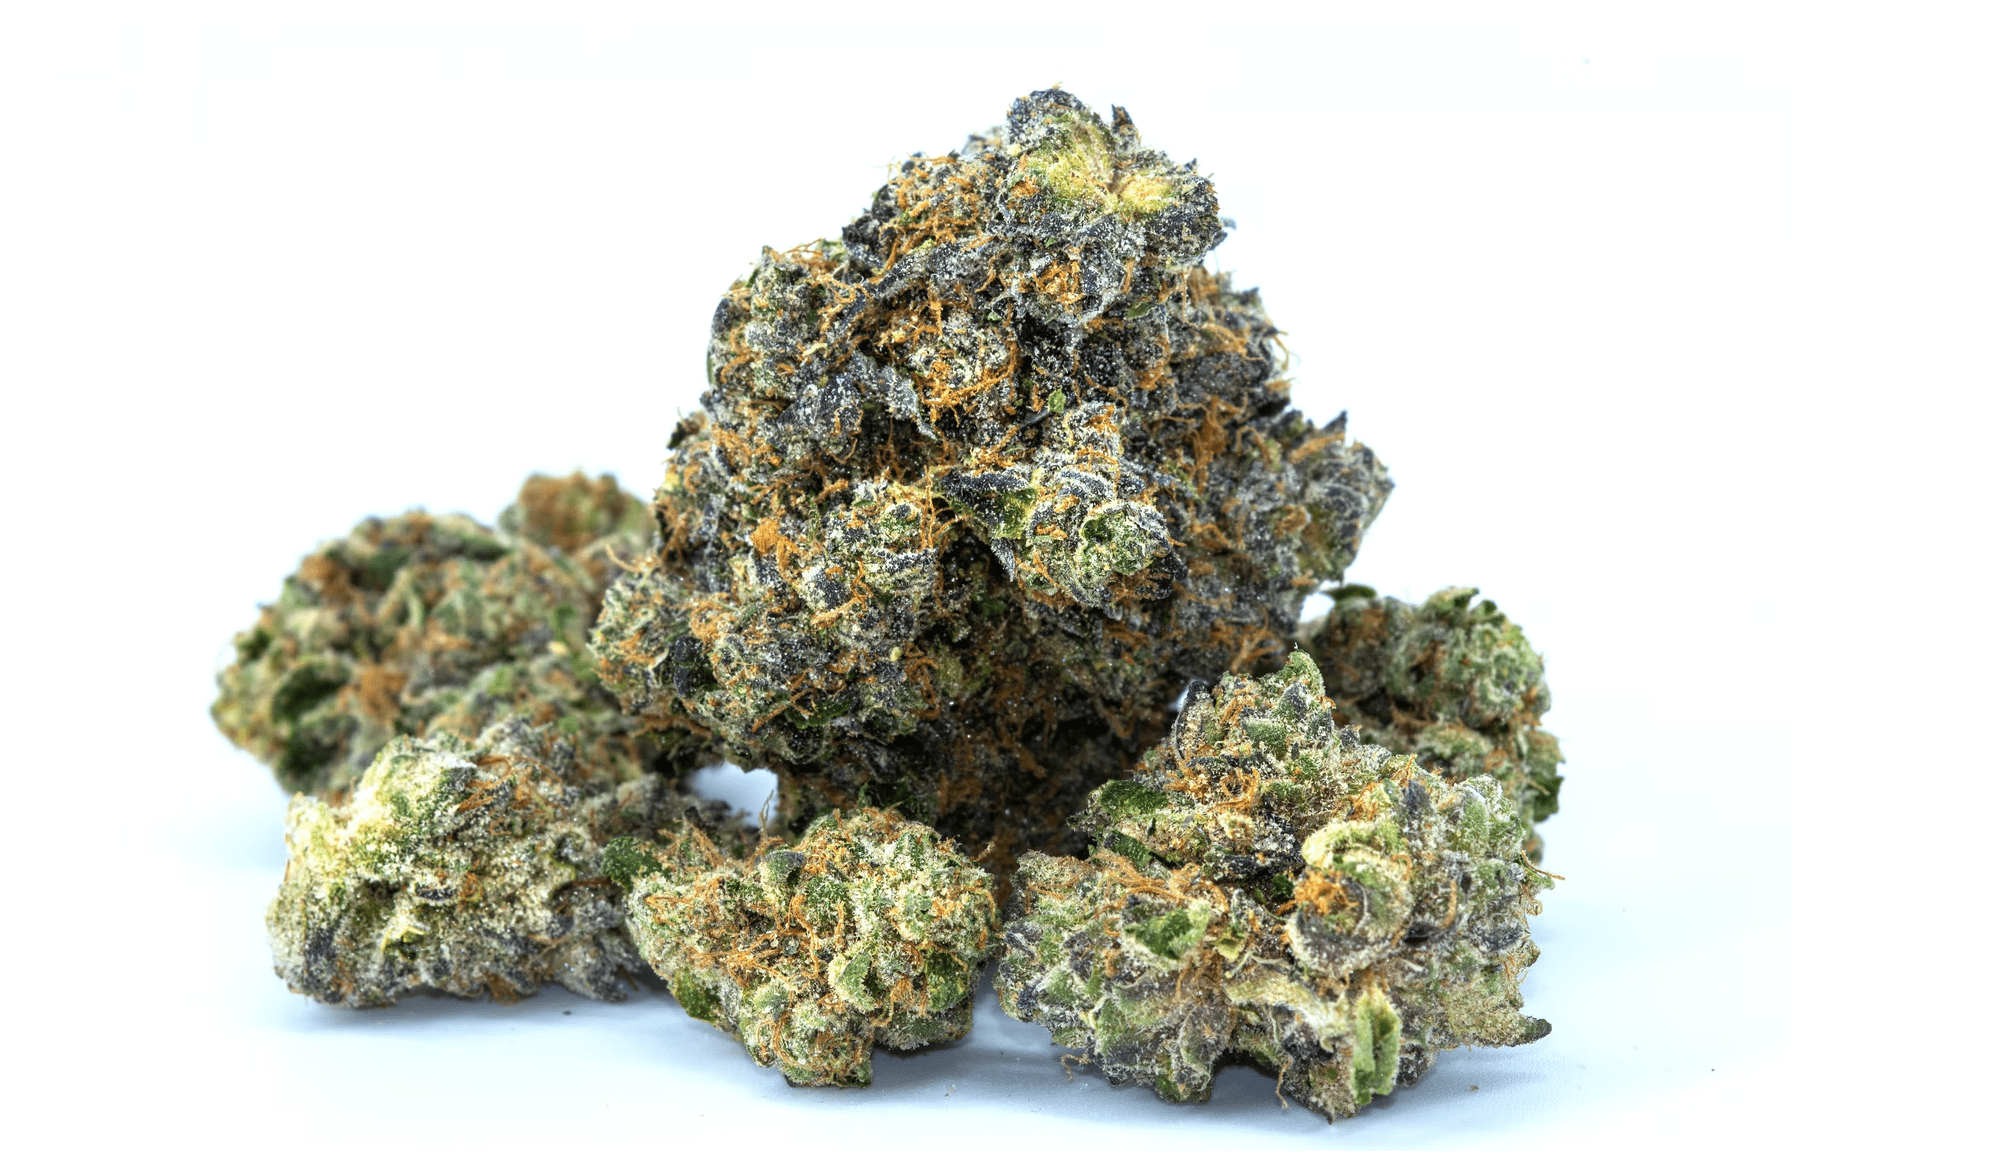
I will give you an example of what I mean. I am big on Afghan Landrace, danced with this strain for over 40 years and I love it. It helps me sleep, cuts my pain levels better than anything I have ever found. As far as I can tell I am the only one in North Eastern Oklahoma that grows it. Until August of this year, I had a trusted source for this stain. That source dried up in August of 2021. I am fortunate that I let one plant produce seeds last year so I have enough to plant this year. When you say Afghan Landrace, it’s like saying Mexican Landrace, what I mean by this is there are many different strains in each country. To be exact my Afghan Landrace is the Tora Bora strain. If I tried to market it as that people’s heads would spin, so I just test it under Afghan Landrace, with is accurate, but not as accurate as it could be. If I were in a more developed market I would call it its exact name.
This strain tested 18.49 % THC with a terpene profile of 10.58 %. This is the highest terpene profile I have ever grown. Did I just get lucky or did I get everything right? I think it’s a little of both. I assure you this is the best I have ever grown. It also produces between 40 and 49 grams of kief per quarter pound.
Preparing Cannabis Seeds To Germinate
OK, so now you know how to narrow down your seed selection. I am old school on how I do it I select fifteen to twenty strains that I am going to grow for the year. I write them down on a legal pad, then drill down on each one for the criteria I have listed above. I also include the ones I had great success with the previous season. No big surprise that 50% of what I grow is Afghan. I narrow my selection down to ten new strains. I spend a day doing research on the new strains. Rember Prior Preparation Prevents POOR Performance. Spend the time by investing in your grow please do not take shortcuts, and remember, take the seed company’s say with a couple of grains of salt. I figure if you take the yields they say and divide them by half, you will see what you can expect to yield realistically.
Red Afro Cannabis Bud
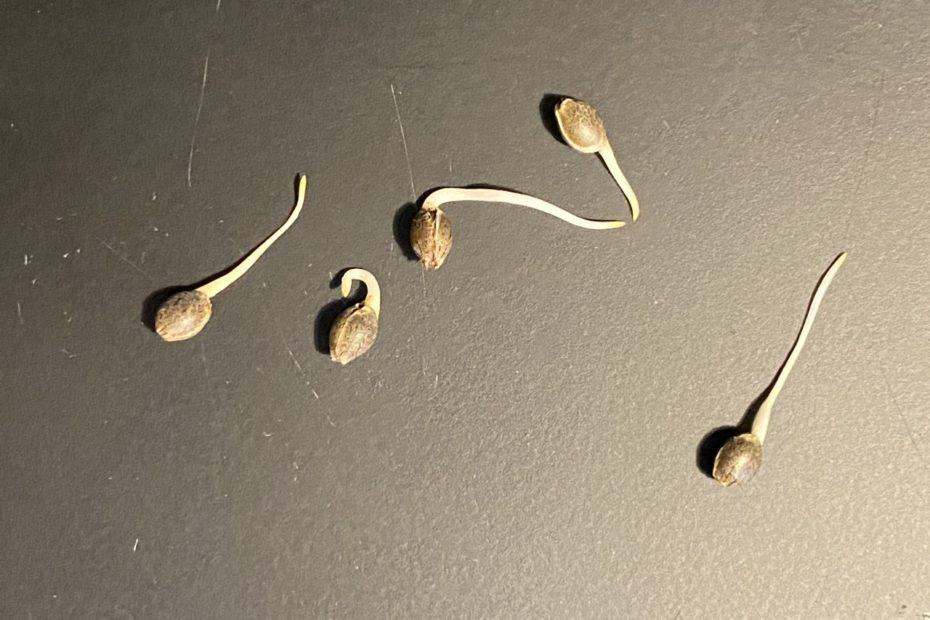
So now you have your seeds and you are ready to go, lets see how I germinate. I realize there are several ways to germinate seeds, but this one is simple. I have a 98% germination, you are going to get a bad seed occasionally, life happens.
I want a month and a half before I transplant outdoors. I will not transplant until there is more than 12 hours of light during the day. There are several places online where you can check the amount of light available for each day of the year for your exact location, just Google it. I also transplant two weeks after the date of the last killing frost. You do not want to jump the gun. It’s no bueno to rush into it and have your plants freeze, at the minimum they are stunted, way too much stress, worst case they all die. I start my seeds on March the 18th with is also a full moon. The full moon is the absolute best time to start seeds that produce a crop above ground. I will transplant into grow bags on May the first. This is a waxing crescent which is a good time to transplant.
How To Germinate Cannabis Seeds
I start my seeds very simply. Before I get into that I want to discuss water. I have a well the water is between 6.2 and 6.7 pH, so it is good to go. This is my opinion, some people get really twisted over water quality. I try to give my plants tough love, I don’t think in Afghanistan they use RO water and they do a good job growing. If you want to use RO, bottled or any of the other sources feel free. The only thing that concerns me is chlorine and ammonia. These are added to water to kill bacteria. The last thing I want to do is kill bacteria in my soil. bacteria feeds the root remember this adage, “FEED THE ROOT, FEED THE FRUIT” I would suggest you make this your grow mantra.
To remove the chlorine and ammonia from your water, all you have to do is fill a container with a large opening and let it set out for three days. The chlorine and ammonia dissipate after three days. An old trick I learned from my aquarium days.
To germinate my seeds I soak them for 24 hours, then place them on a slightly damp paper towel, place them in a zip lock back, which I plow into, then seal. I not blow not for the co2 but to keep the bag off the paper towel. Some people say this gives a co2 boost, it might, but I would not put a lot of credence into it. I then place them on a heat mat and check every 24 hours. I get between 40 and 50% to pop just from the soaking. I do not place in the soil until the root is 1/4 inch long. In case you don’t know the tip of the root goes down, and the seed head up. Not being insulting, just writing at the level where I think everyone is new to growing, after all, we all started somewhere. My well water is 63 degrees F and before I place my seeds in the water I let it come to room temperature. There are lots of additives people add to the water. The only two I would recommend are Super Thrive and Dr. Jimz Chicken Soup for Marijuana. Only add one drop for 8 ounces. Dr.JIMZ is far superior to Super Thrive, for several reasons but the main reason I absolutely love DR. JIMZ Chicken Soup for the Soil is the microzyme in it. This stuff is liquid gold. Next I will cover planting. Remember the grass is not always greener on the other side of the fence, lets make yours the greenest. Happy growing.
How To Start Cannabis Seeds In Soil
I try and start my seeds during a full moon phase. This is a time-honored tradition and the University of Western Australia performed a study on crops that produce above ground in the ’80s and found there was approximately 20% increase in yield. My Grandmother always planted by moon phase and sign. She always had a fantastic garden, she had to have a successful one, a large portion of her food for the year came from that garden. I have not quantified this, but I have always had good results.
This year I did something a little different. I always try to improve results and encourage you to do the same. I know you most likely want to improve year-over-year results as well or you would not be reading this article.
This year I added two Dr. Jimz 3-2-1 Grow Tabs with mycorrhizae to one gallon of water, then filled my soaking jars with that solution. Remember the mantra “feed the root, feed the fruit”. Well, I decided to try and kick start the rooting process with the addition of the Grow Tabs.
The seeds soaked for twenty four hours, then I place them in a damp paper towel, on a seedling warming pad, in a sealed zip lock. I then cover the seeds with a five-gallon black plastic tote to prevent any light from seeping through.
To get the paper towel wet I suggest simply dipping the paper towel into the water you soaked your seeds in. You just want the paper towel damp, not wet… if it is wet you create mold. I know this from experience. Once you have placed the seeds in the paper towel, gently slide the paper towel into the zip lock. Then seal the zip lock up most of the way, then gently blow into it. This creates an air cushion to keep the plastic away from the paper towel with the seeds in it. Some say that the blowing adds essential CO2. I seriously doubt it does.
Do not get into a big rush and check your sprouting seeds every fifteen minutes. Three times a day is enough. You would be surprised how fast they will sprout. Try and plant when the young root is about a ¼ inch long. If it’s a little longer no worries, I have successfully transplanted up to a ½ inch. However, I have found ¼ inch is the best way to go.
What Type Of Soil and Container To Use?
Some people, like rock wool, some like straight perlite, coco coir, clay balls, or peat plugs. The list can go on and on. If you have a favorite starter medium, by all means, use what you like and are comfortable with. No need to reinvent the wheel.
I use the exact soil I use in my 25 and 50 gallon grow bags. It is my belief that this produces less stress on my plants. The less stress you place on your plants at the start of their life the better harvest you are going to get. We will discuss stressing the plant during the last four weeks of the flower cycle to increase terpenes, trichomes, and THC.
I plant straight into a 16-ounce solo cup. I use green ones for the THC Strains and red for the CDB strains. Why?, because I am OCD. I take a lighter and melt a dime-size hole in the bottom of the cup. More drainage is better than less drainage. You can always water more, but very difficult to take excess water out of your soil. The last thing anyone needs is root rot. I use a blunt-ended chopstick to make my holes. I try to get as close to the center as I can. I take a pair of long tweezers and place the root down and seed head up in the hole. I have 46 plants in a 16 oz solo cup with very fine dirt. It is the same dirt that went into the cups to start with. When I say fine I mean fine. I run the dirt through a flour sifter. When the seed is placed into the hole I carefully backfill with the sifted dirt, label the cup with blue painter’s tape, with cannabis strain and date. Then place the cup aside and repeat the process until all seedlings are planted.
How To Water and Transplant Cannabis Seedlings
The next step is where many people make mistakes. No big deal we are here to learn. Like most people, I used to water my seeds in but learned that is a very bad method as it compacts the dirt. I use a dedicated mister that has been dialed to a fine mist… I soak the top of the soil for the outside rim of the cup to the center. Then repeat the process until you are finished. I place my lights 18 inches from the top of the cup. I then adjust the height as my ladies grow. Your lights may be different band, wattage, etc, it is best to follow your manufactures directions.
I transplant into my 25 and 50 gallon grow bags when the cannabis plants are approximately 18 inches tall, and it has been two weeks past the date of the last killing frost with at least 13 hours of usable light. Some people like to have an intermediate step or two between starting and final transplant. I have always achieved better results and less work with cup to bag.
When it is time to transplant, dig a hole at least twice as deep and wide as the solo cup. I typically dig the hole four times the size of the solo cup. When removing your girls from the cup, take a pair of scissors and cut the cup down both sides to remove your plant… Do I really cut the cup? Yes, solo cups are cheap, but damaged roots lead to problems and diminished yields.
Have your hole dug before you cut and you can adjust the sides of the hole once you see how big the root system is.
Once the hole is the right size, gently remove excess dirt from the root system. Gently take the plant with one hand and lower it into the hole until only two to three inches of the stalk are exposed from the top of the hole. Then remove any leaves that would be below ground level. While holding the plant use your other and to backfill the hole. Do not pack the dirt, just fill the hole. Once you’re done look at the plant to make sure it is as straight as possible. This helps to prevent your girls from stalk damage when they get full of those heavy/dense buds you are going to have!
Once the plant is straight to your satisfaction, gently water the plant in. You do this with a watering can going around the diameter of the hole you dug. This process creates good contact with the roots and soil and eliminates any air pockets. Hold the plant when you do this because they always shift to one side. If the soil shrinks below ground level, you have transplanted correctly, all you do is top off the soil depression. Do not water again.
When doing this method your girls develop roots out of the buried stalk.
Please note: You can google the date of last killing frost for your zip code, then I would highly encourage you to add two weeks. Mother Nature has a nasty habit of slipping into a hard freeze at the last minute. You can check the amount of usable daylight as well. It is best to have a minimum of twelve hours of daylight, any less and your plants get stunted… not a true re-veg but close. So it is always best to give yourself a safety net. I have learned the hard way. Again the less stress on the plant the better and bigger harvest you will have.
Growing Cannabis In Living Soil
Now, let’s talk about the most important aspect of growing quality Cannabis, LIVING SOIL. Books have been written about living soil, I am not going to do that, instead I will simply sum up what living soil is. You have a proper mix of micro & macronutrients and beneficial bacteria that form a symbiosis between the soil and the roots which allows your plants to take what they need from the soil with as little stress as possible.
The majority of all commercially prepared soils are too hot for Cannabis, and by hot I mean they have too many synthetic nutrients in them. The hippy trippy frog soil is owned by the king of GMO’s. I will not call them out but do a little research, we all know about them.
I have to keep things simple or I screw them up, so just remember fed the root and you feed the fruit, in the case of growing cannabis we are talking about the flower. You must have a healthy root system for your girls to be happy and successful wherever you grow. I mix all my soil, in a cement mixer which is a lot faster and easier on my back than doing it by hand… but I fill 100 twenty-five gallon bags and it is still a long day of work.
Cliftons Living Soil Recipe and Grow Bag Instructions
This is a very basic recipe of how I make my soil, 50% topsoil and loam, 25 % perlite (vermiculite holds water, and you do not want soggy roots) some diatomaceous earth 5% (makes stronger stalks) the 5% hardwood ash and 15 % peat moss. You can mix it up on a small tarp or if you have a bigger grow or bags you can use a kids pool.
This is three shovel fulls of perlite, one and ½ diatomaceous earth, and the same for the hardwood ash. I have a fireplace so I save all my ashes. I never throw plastic or trash into the fire. I will burn banana peels and citrus peals, but that is it. I have not found a good substitute for the hardwood ash. If you don’t have access to it, I would just add more dirt.
My cannabis plants root balls fill the entire grow bag. Top to bottom, side to side. They have to have big root systems to do well in the harsh conditions I grow in. When I fill the bags, I fill them to within six inches of the top of the grow bag. This leaves enough room to water the bag. When the water gets to the top of the grow bag it is enough, or when the bottom of the grow bag turns dark. When you water you water deep or you get a shallow root system. Small root balls equal plants that are small, susceptible to pests, disease, and wind damage. Grow bags are forgiving in case you water too much, the excess water just flows into the ground.
When you fill the grow bags, it is important to make sure the dirt is level in the bag. It’s not just an OCD thing. Level dirt means even watering. This in turn ensures an even full growth of the root ball.
Once the soil is made, you just can’t forget about it, you have to feed it, which in turn feeds your plants. I only feed organic food, I use vegetable scraps, grass clippings and work them into the top of the grow bags. You can dig down in work it in because about an inch under the dirt you have a mass of roots.
I do continue to inoculate my soil with Chicken Soup for the soil Cannabis Fertilizer. I use one gallon per 55-gallon drum, and I feed that once a week.
I also leave my root balls in the bag after I chop. I do not remove the stalk until I rework the grow bags up in the spring. All that is removed at that time is the stalk. The old roots have been turned back into the soil. So I have a jump on creating LIVING SOIL. I also start feeding my soil in February when it starts to get above freezing at night…. you can feed while it’s still freezing, but everything stays dormant.
Should I Flush Cannabis Plants?
When I share this next technique with you, some of you might start scratching your heads and think I am crazy. I do not flush my plants. Yes, you read that correctly. The reason I do not have to flush my plants is I do not fill them up with man-made chemicals, to get a higher THC, Trichomes or Terpenes.
Growers flush to get rid of the harsh chemicals. Think about what flush means?, then ask yourself why do I want to flush the nutrients out of my plants. Well if you use man-made chemicals, you have to so the final product is enjoyable. I visit the dispensaries I sell to and I have a good relationship with the owners. They have seen my grow operation, and know how I feed the plants and trim. In fact, they know every step of my business. I believe that people should know how their medicine is grown, what goes into it, and more impotently what does not go into it.
I visit with customers who buy my product, and the majority are repeat customers. I ask to hear their thoughts and am constantly told that I grow the smoothest smoking cannabis in my market. Is it because I know everything about growing? hardly. However, I do know the importance of making living soil, and do my best to unlock my ladies’ genetic potential.
Powdery Mildew Cannabis / Bud Rot & Mold
Let me share a bad experience with you. It has been said that knowledge/wisdom comes from making mistakes. If that is 100% true, I should be one of the world’s wisest people. I have made my share of mistakes and tried to learn from them.
One of my first strains was Durban Poison in my first year of growing. I planted what I thought were ten good genetics of Durban Poison. Man, they did great, super cropped and lollipopped (we will cover those techniques later), absolutely stunning plants. They were between seven and eight feet high, with colas as big and long as my forearms.
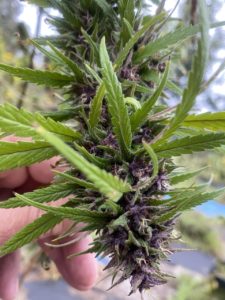
With a crop like this, I was counting that money in my mind because at that time the prices were $1400 a pound wholesale. When harvest day rolled around I chopped the first colas; the calyx to leaf ratio was fantastic, and it only took 30 minutes to trim the first one. I was finishing it up when I noticed a brownish white fuzzy patch on a bud. I thought to myself, “you don’t want that on your product,” so I trimmed it off.
Well, the bud fell off. Then I looked at the next bud up from that one, and it had more of the brown white fuzzy growth on it. To make a long story short, the entire crop of Durban Poison, 35 pounds of colas had bud rot; this represented approximately 9 pounds of cured flower. I burned every one of them. People tell me I should have sold them for extraction, but my philosophy is “if I don’t use it, I won’t sell it.”
So I started wondering, as only someone with OCD can wonder, how in the hell did this happen, there were no signs of it on the plants, and Durban is supposed to be mold resistant. After a ton of research, I learned that powdery mildew/bud rot starts on the stalks of the plants. If dense buds are grown in high humidity, you will have it. Remember genetics? If you dig into the strain, you will discover that Durban Poison has been inbred so much that it is far removed from the original. Think of all the problems the Hapsburg line had in Europe.
More on Powdery Mildew and Bud Rot
So what do you do? Just grow auto-flower and hope for the best; well, you could, but I would not recommend that. In Oklahoma, unless you live in the far western half of the state, you will have powdery mildew and bud rot. Figure all of your plants will have it from the jump. The super soil formula will help somewhat. The beneficial bacteria and amendments help make a vigorous plant with a healthy immune system, but it is not enough.
Bud rot is a mold that grows inside of your flower. Bud rot and powdery mildew will ruin the grow, no matter if it’s indoor or outdoor. It all starts on the stems of your plants. Once it spreads to the buds, it is almost impossible to see. Once you see it, you can’t save the plant, and if you’re lucky, you might be able to save those around it. The problem is once you see it, the bud rot has already spread by spores to other plants close by and possibly some far-away plants; this depends on luck and the wind. I consider Bud Rot and Powdery Mildew to be the STD of the marijuana world…
The key, and I can not stress this enough, is prevention. Once you see Bud Rot and Powdery Mildew it’s too late. That plant has already been compromised, and you have to get rid of it. In my opinion, it is not worth the risk to infect your entire years grow for one plant. The technique I use for bud rot /powdery mildew can be used on any plant you grow.
Powdery Mildew Treatment
The first step to create a healthy mold and fungus-free crop is to spray my seedlings with a solution of wettable sulfur powder. It does not matter what brand you use as long as it is 99% pure or higher. I found the cheapest online; I also got free shipping on it. These next steps are exactly what I do, and my entire harvest passed a full panel screen. Even if you do not grow commercially, you do not want to smoke anything with powdery mildew or bud rot. You can use this solution as long as the plants are in a vegetative state. NEVER USE SULFUR when the plant is anywhere close to the flowering stage; the sulfur is fine and will stick to the trichomes, you can’t remove it, and it will ruin the plant.
The formula is very straightforward, one to five tablespoons of wettable sulfur per gallon of water; my happy place is two tablespoons per gallon of water. I spray this solution on my girls two weeks after putting them outdoors. Two weeks is a good time for this, so the plants have adapted to the transplant shock and are far enough from the flowering stage that you have no worries about ruining your plants. It would help to keep whatever container you are spraying with shook up or the sulfur precipitates to the bottom. One thing about spraying is never to spray when the temperature is above 90 degrees Fahrenheit and sunny. The water droplets act as tiny magnifying glasses and will burn your plant. There is an exception to this that goes against all conventional wisdom: spraying milk, which we will go over.
When spraying your sulfur, start by getting the stalks drenched by literately, starting at the top of the stalk, working your way around the plant, and spaying until the solution runs down the stalk. Then you want to make sure you get into where the stalks connect to the stem. The next area you spray is the underside of the fan leaves. Your last step in to spray the tops of the fan leaves. This may seem like overkill, but this initial investment of time pays enormous dividends.
After your initial treatment with the wettable sulfur, I wait two weeks and start spraying a 20% milk water solution. I mix one gallon of whole milk with four gallons of water. Then I hook my airless sprayer up and spray. (it is a dedicated sprayer for cannabis, if you have used your sprayer for anything else, do not use it). The nozzle that comes on the sprayer creates a fine mist, and you do not need to buy another.
I also label my hand pump sprayers for nutrients and bud rot/powdery mildew, so I never switch. I simply use a black sharpie. Does it make a difference? Probably not, but I do not want to take a chance of damaging my crop from me being lazy.
I use three to five gallons of milk a week in June, July, and August. I will do my best to explain why the 20% milk solution works; some sources say you can go as low as 10% with a maximum of 20%. So based on my experience, I use the 20%. So people say to use skim milk or organic milk, but in my opinion, it makes no difference. The reason milk works are the Lactobacilli creates a slightly acidic environment that is fatal to most molds and fungi. That is the simple answer to the question.
For the milk solution to work, it must be sunny and warm; some may say hot. I have spayed when the air temperature was as high as 95 degrees Fahrenheit with zero damage to my plants. You have to spray when it is sunny and hot with the milk solution because the light and heat activates the Lactobacillus and causes it to ferment. This causes the Lactobacillus to grow… I will tell you that if you use whole milk, you will get some funky smells coming from your grow.
The reason for that is the fat content. It does nothing to affect the quality of your bud. If I had a dairy around me, I would try and get old milk because it already has an intense concentration of the Lactobacillus growing in it.
I spray at least once a week. You may think that is a pain, but remember, you have to chop and burn once your plant becomes infected. If it rains in the same week and really wets the plants, it will wash off the milk solution and you have to spray again. I live 30 miles from the nearest store, so it can be a hassle, but it is better than burning my crop. Never compost it because all you are doing is growing more pathogens; the same thing if you bury it or kill it with fire.
To make the milk solution stick or better adhere to your plants, I add one teaspoon of liquid organic Castile Soap to the solution. I have found the castile soap online. I chose an unscented, hypoallergenic for baby’s and have had zero ill effects using it. Five gallons of milk solution works out to a tablespoon and a half. Yes, I do measure precisely or as close as I can be. It is always better to measure the amount of what you are using slightly less than slightly more.
The way I mix up the solution is to add the one gallon of milk to the five-gallon bucket, then the castile soap and fill slowly. Yes, I made the mistake of filling the bucket with the water coming out of the hose full force. You get a lot of suds and have to start over. So trying to take a shortcut is not always a good idea.
How To Make Powdery Mildew Cannabis Mold Treatment
To make the milk solution stick and adhere to your plants better, I add one teaspoon of liquid organic Castile Soap to the solution. Five gallons of milk solution works out to 1.5 tablespoons. I try and measure as precisely as I can… it is always better to measure the amount slightly less than slightly more.
The way I mix up the solution is to add one gallon of milk to the five-gallon bucket, then add the castile soap. Make sure to fill the rest of the bucket with water. Yes, I made the mistake of filling the bucket with the water coming out of the hose full force. You get a lot of suds and have to start over. So trying to take a shortcut is not always a good idea.
Another way to limit your plant’s exposure to powdery mildew and bud rot is to water only from the bottom. A water hose is not your friend when it comes to watering. I use a spray wand with an adjustable spray head. Using a wand allows you to water the soil and not splash your plant. When picking out a spray wand choose a metal one with a cut-off flow switch near the handle. This allows you to shut the water off in between plants and also helps to prevent water from splashing the plant.
How To Space Cannabis Plants
When planning your grow it is important to make a growing area that is not conducive for powdery mildew or bud rot to grow. What I mean by this give your girls plenty of room to grow and have good airflow between the plants and in the plants as well. I space my plants on ten-foot centers. An example of this is if you had a 100 square foot growing area you only want to put ten plants in it. Can you get more in there yes but it will be packed and you will not have good airflow.
The spacing of your plants also depends on the size of your grow bags or if you are growing drectly in soil. I am not going to discuss growing in soil, because, frankly, it is too difficult to control the amount of water, potential pests, and overall soil quality.
The ten-foot center is for a 25-gallon grow bag. For my 50-gallon grow bags I use 20-foot center spacing. The 50-gallon grow bags I reserve for plants that have the genetic potential to be larger than 6 feet in height. Unless I am trying to grow some trees, I keep my plants topped to 6 feet now. The main reason is I can reach the top of a 6-foot plant and do what needs to be done to it. It also allows the plant to concentrate on flower, not height. I rarely grow sativas, they get too tall and have airy buds. I have experimented with Tropical sativas, and they have been as tall as 15 feet. I did not have any problems with the plants, but if I had, there would have been no way to work on them.
How to Lolipop A Cannabis Plant
I would also suggest that you look into learning how to lollipop your plants. Lolly-popping is simply removing the bottom growth of the plant for approximately 1/3 or two feet. This allows for superior airflow. You can get carried away with it and affect the plant’s yield. Remember the leaves of any plant are solar panels that allow the plant to produce energy for the metabolism of nutrients. When you have more energy you have bigger buds with more trichomes and higher terpene levels. There are several decent videos on social media channels that demonstrate how to do this. Watch several so you get a good idea of how to do it. Lollipop has the added advantage of forcing the plant to send all of its energy to the top of the plant making fewer but bigger buds
The takeaway from this is you must have an active prevention plan. Doing just one thing to prevent powdery mildew and bud rot is not enough; you have to have a multi-faceted approach to prevent it. With the plan, you must walk your plants daily, which you should do anyway, and spray at least once a week, depending on your weather conditions. If you don’t do this you will end up with powdery mildew and or bud rot unless you live in a desert environment.
If your plants become infected, not only have you wasted your time, effort, and money… you have also opened the door for pests which we will discuss next.
How To Protect Your Outdoor Grow From Pests
In my opinion, the most common pests we face are; Aphids, Spider Mites, Whiteflies, Stink (Shield Bugs), and caterpillars. The Caterpillars are the easiest to deal with so we will discuss last.
These are all pretty easy to deal with, but it’s just like bud rot and powdery mildew, you must be proactive. You will go from a few aphids to a horde of the plant-sucking demons overnight if you are not careful.
Once you get the explosive outbreak of afids they are almost impossible to get rid of if you grow organic. Aphids are hard to see until you get the population explosion.
So also look for ants and ladybugs. If I have just a few ladybugs, no big deal, but when you see fifteen to twenty on a plant you have problems, so break out the good old loupe and start checking the undersides of the leaves.
I had a plant one time at 10:00 am they were fine, checked the girls again at 4:00 pm and it was completely wilted and drooping. When I took a closer look at the plant I found that the underside of the leaves and stalks were absolutely covered with aphids. The plant was about four feet tall and I bet it had thousands on it. It can happen that quickly. It’s my bad for not looking more closely at the plants when I was walking them. I had to break out the hose, turn it on low and wash every leaf. I refuse to spray chemicals.
The best way I have found to monitor for aphids is to watch for ants. Ants and aphids have a symbiotic relationship. The aphids produce honeydew and the ants offer protection. The problem with the aphids as they feed on the sap of your plant and can cause quite a bit of damage.
Ants in the Cannabis Plants
While ants by themselves represent no real threat to your grow, what they bring to the table can create serious problems. If one plant has ants you stand a very good chance for your entire crop to become infested.
While you may not lose your entire crop, at a bare minimum you will suffer decreased yields. You may have already figured out what I am talking about, APHIDS. You will see the ants long before you notice the aphids. Ants and aphids have a symbiotic relationship. Get rid of the ants and the aphids go away as well. By the time you see the aphids, you are facing a long uphill fight to get rid of them.
While an aphid here and there won’t kill or hurt your grow, the infestation will. As with any pest or disease prevention is always the best.
How To Get Rid Of Ants And Aphids On Cannabis Plants
The best way I have found to get rid of the ants and their little buddies the aphids is through water. Look at you ladies from the underside of the leaves, and if you see tiny white shapes you have aphids. Take a water hose with a sprayer attachment and spray the underside of the leaves and gently rub any white spots away. Then soak the soil of the plant, and I mean water it deep. Ants do not like a flood. You will need to do this for 3 to 4 days. The ants move or drown, and the aphids die from too much water and they have no host to take care of them.
The other is diatomaceous earth (DE). You need to use food-grade, ants and other crawling insects/bugs crawl over it and the effect on them is like crawling through ground glass, it simply shreds them. Do not water it in, for pest treatment.
Another benefit of DE, when you do water your ladies, is the silica in the DE gets absorbed by the plant, making the cell walls stronger, which helps prevent disease and pest problems. An added benefit is stronger branches that support larger flowers.
I add DE to my girls every three weeks or as needed.
While several good pesticides kill aphids, remember you smoke what you sow. So I only use natural methods. Sevin is not your friend.
Spider Mites on Cannabis Plants
I have never had a real problem with spider mites. The few that I get, I just gently smash them with my fingers. I figure that if they are eating my plants, the least they can do is take one for the team and feed the plant. The best ways I have found if you have to treat them is, Diatomaceous Earth, Alcohol, and Water mixed (9 parts water to 1 part alcohol) will also kill the bugs on contact and shouldn’t hurt the plant. I am not a big fan of the alcohol method; I offered it as an alternative. I feel that any alcohol will strip oils from the plant. That is why my go-to is DE. When using Diatomaceous Earth, you want to use a bulb sprayer. They are inexpensive and work well. I purchased mine online. You have to shake the bulb occasionally to keep the DE loose so it will shoot out. Don’t worry if you get too much out at one time; you can’t kill your plant if that happens. However, you need to get the webbing out of the way, not entirely, but you need an opening in the web.
When using the alcohol, do not spray when it’s bright sunlight or over 80 degrees Fahrenheit; you run the risk of burning your plant. As far as the insecticidal soap, just follow the label directions on what brand you decide to go with. The best times to spray for pests are early morning and an hour before sunset.
Please DO NOT use anything with Spinosad in it. You will not pass the full panel test. If that happens, in Oklahoma, you have to pay to dispose of your Marijuana. These are Oklahoma’s threshold limits:
- A) Spiromesifen < 0.2 ppm (B) Spirotetramat < 0.2 ppm (C) Tebuconazole < 0.4 ppm (D) Etoxazole < 0.2 ppm (E) Imazalil < 0.2 ppm (F) Imidacloprid < 0.4 ppm (G) Malathion < 0.2 ppm (H) Myclobutanil < 0.2 ppm (I) Azoxystrobin < 0.2 ppm (J) Bifenazate < 0.2 ppm (K) Abamectin (Avermectins: B1a & B1b) < 0.5 ppm (L) Permethrin (mix of isomers) < 0.2 ppm (M) Spinosad (Mixture of A and D) < 0.2 ppm .
Some states have lower or higher limits. If you are a commercial grower, you have checked what they are. If you grow for yourself, I suggest you check out what they are to avoid any potential health risks.
If you feel you must use chemicals, I have included a link for the Colorado Department of agriculture. They publish this list and e-mail it to you if you sign up. It is a great tool written in plain, easy-to-understand English; it list’s everything you can use safely on your plants. Colorado treats the marijuana industry as a business and wants to help growers. In Oklahoma, the rules change weekly and you get zero support from the state. I digress, but Oklahoma’s way of managing the industry leaves a lot to be desired.
Colorado Department of Agriculture <cda_info@state.co.us>
So you may wonder why I do not have a spider mite or any mite problem. If you have noticed, I place a great deal of emphasis on prevention. When it pertains to Marijuana, it is the most important thing you can do. Ever heard of the six P’s? They stand for prior planning prevents piss poor performance, which is spot on for Marijuana.
White Fly’s On Cannabis Plants
These are every grower’s nightmares. You see a few one day, think no big deal, two days later you have hundred’s or even thousands if conditions right. Whiteflies are so small that they are capable of even entering sealed greenhouses. World wide they cause billions of dollars a year in crop damage.
They are similar to aphids in how they damage your crop. Whiteflies can cause two types of damage to a plant. The first is considered to be “direct” damage. Whiteflies will do some severe damage to your girls if not taken care of quickly. Whiteflies can damage plants by consuming the fluids they are made from. This will cause the leaves to turn yellow, shrivel, and fall off. If the population of whiteflies is great enough, it will lead to plant death. Whitefly adults cause the second form of damage. They transmit several viruses from diseased to healthy plants through their mouthparts. Whiteflies (just like aphids) excrete “honeydew,” and the honeydew then attracts ants. If the honeydew is allowed to go unchecked it becomes colonized by a fungus called sooty mold. The sooty mold makes leaves look black and dirty. Sooty mold is harmless except when it is abundant and prevents photosynthesis. Which causes plants to become stressed. This will lower the yield and quality of the harvest. Simply wash it off with a strong stream of water on sturdy plants if it becomes a problem.
Remember ants? If there are high populations of whiteflies, most likely there are ants present. Ants love to feed on honeydew, and to ensure a continuing supply, they protect whiteflies from their natural enemies.
The best way I have found to get rid of and control Whiteflies is through the use of yellow sticky traps. These are the ones that are 3″ x 5″ dual-sided with tape covering each side. I put these out the same time I transplant outside. I take metal coat hangers and make two stakes out of each one. On one end, I twist around, making what I call a pigtail, so the sticky traps stay securely put. Trust me; you do not want them blowing off because of the wind because they stick to your plant.
Stink Bugs On Cannabis Plants
I hate these worse than any other pest. Stink Bugs are like smelly vampires; not only do they suck the life out of your plant when they pierce the wall of the stalk, they more than likely will infect your plant with their bite per se. Anytime the stalk wall is opened up just like a wound on a human, it opens the plant up for infection and disease. So, should you be worried about stink bugs in your garden? The answer is a resounding “yes” as they lower the quality of your grow.
Stink bugs use their beak to pierce and suck out the juice from the inside, leaves, buds and stems of plants to feed themselves. Besides, they also poop all over the plant when they feed. Additionally, stink bugs can carry viruses that they spread to your plants. They will cause even more damage to your plants by spreading yeast spot infection, which significantly reduces crop yield.
I used to catch them, toss them to the ground and step on them. I thought I was doing the right thing, just to see more and more in my grow when I did it. When you crush a Stink Bug, the smell they put out is a powerful pheromone that attracts more stinkbugs! So when it’s stink bug harvest time I have a one-gallon milk jug that I have cut off part of the top. I fill it ¼ full of water and add a squeeze of dawn. I just catch them and put them in the jug. Then I carry the jug a few hundred yards away and crush them. Payback can be a bitch, but it is very satisfying. They do make traps that are supposed to work, and there are videos on social media on how to make them. I do not think they work very well, or the EPA would not consider them to be such a problem. I also feel that if you try trapping them, you will kill more beneficial insects than bad ones.
Caterpillars On Cannabis Plants
I typically start having problems with caterpillars in the last half of the grow and towards harvest time. If you are curious, the most common caterpillar is called a European Hemp Borer. They will eat the inside out of a bud quickly, and what they don’t eat, they poop on, making it unusable. Here is what you look for:
Seeing leaves that have been chewed, holes in them, or just a stalk with no leaves, guess what you have a caterpillar problem. Sometimes you will have cutworms, they are a caterpillar, but they attack at night. In my experience, a few of these will do more damage than several butterfly caterpillars. I have killed three so far this season. The best way to find cutworm caterpillars is to look at the base of the plant’s stalk. They usually hide just beneath the soil there. They are light gray to dark brown and are up to two inches long. Just smash them, then add them back to the soil.
Look for dark stains, little pill-looking things (poop), and brown spots on your buds. Caterpillars love to select your best bud’s to munch on. They start on the inside and work their way out. The only way to catch the problem if they are in the bud is to walk your plants daily. I have never experienced the lower buds being eaten. The best way to get rid of this problem is to either remove the entire bud or cut the affected part off.
The poop on the leaves and bud helps botrytis, more commonly known as gray mold to start colonies.
How To Treat Cannabis Plants For Caterpillars
There is an excellent product to kill caterpillars and it’s called Bacillus Thuringiensis, referred to as B.T. BT is a bacteria found in soils around the world and is the world’s leading pesticide. The way it works is when the caterpillar chews a leaf with BT on it, the BT creates spores in the gut and then the spores make holes in the gut. The caterpillar dies a few days after ingestion. It has the added benefit of stopping the caterpillar from eating almost immediately. BT can be used up to the day of harvest.
I would say if you are harvesting Marijuana with caterpillars in it, you must be pretty desperate. To prevent problems like this, walk your plants daily. If you have some that are dead inside the bud, you get rid of the caterpillar residual by bud washing.
DO NOT USE ANY FORM OF PERMETHRIN. Yes, it’s organic, but it will ruin your crop.
DO NOT USE ANY FORM OF NEEM OIL. It’s organic, but can burn your crop, alter the flavor, and chemically burn your lungs if too much is used. My lungs got chemically burned while in the Army. Let me assure it is a long painful road for them to heal. Once healed you will always have scarred lungs. It is simply not worth it.
I also practice companion planting. I have found it a great method that helps to control pests requiring no additional work on my part after I plant them. I grow three types of plants, Nasturtiums, Dill, and Basil. There are many others as well. From my experience and research, these three plants do what I need. You may have specific issues with other pests, so you may need to do something different.
Beneficial Insects
I have not written much on this topic, because I figured most of you know about Ladybugs, Wasps,
Lace Wings, and Praying Mantis; these are the most common beneficial insects. You only need to worry about them if you see a large population in your grow. This indicates a bad bug infestation.
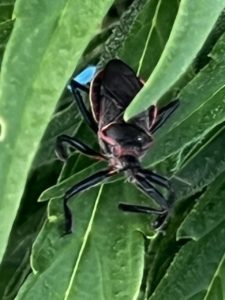
Milk Weed Assassin Bug
However, there is a beneficial bug that is called the Milk Weed Assassin Bug or Red and Black Assassin Bug. I am including a picture for your viewing pleasure. If you see them they are great to have in your garden as they eat everything including stink bugs. And hen I say everything, I mean everything… including other beneficial insects. I have five that I have seen, yes I walk my plants in as much detail as you should.
The other yellow-looking beetle is a cucumber beetle. These should be a concern, they are very small and hard to see. Cucumber Beatles fly away or drop at the slightest movement of the plant. I have killed five today, but I bet I have more. They come out at dusk and are typically active at night. A few do

Cucumber Beetle
not cause major problems, they mainly eat holes in the leaves, but you do not want them in your buds.
So, the Assassin Bug, leave them alone, they also have a very painful bite, the Cucumber beetle smash every chance you get.
How To Use Companion Planting When Growing Cannabis?
Companion planting has been done for thousands of years; it is all organic, you plant it once, and it is effective for the entire grow cycle. It improves the quality of your harvest and helps protect against pests.
Companion Planting Keeps pests away.
Keeping pests away is the main reason I use companion plants. It also reduces the amount of work I have to do, reduces the cost of maintaining my grow, and keeps the plants healthier, making for a better harvest.
The Nasturtiums do two things; first, they are known as a sacrifice plant, bringing pollinators into your garden. The meaning of a sacrifice plant means precisely that. They look good to other insects and they will munch on that before they munch on your Marijuana, in theory at least. I have seen grasshoppers go to them before they attack your Marijuana. So I have noticed that work.
As far as pollinators go, I am not in the seed business; I am in the bud business. They do bring in lots of other insects, which brings in lots of predatory insects. The predatory insects are what I want. There is no need to buy them, and there are plenty of places online that sell them, but there is no need. Let nature figure out the right balance for you,
Dill plants
Repels aphids and spider mites and acts as a sacrifice plant for caterpillars. Butterflies prefer dill to Marijuana, so they will lay their eggs on the dill instead of your grow. You then choose to let the caterpillars finish their life cycle or get rid of them.
The scent of dill repels spider mites and aphids. It also attracts wasps. Wasps are carnivores for the most part, and I believe you can’t have too many of them flying around to eat the bad guys. There are a few drawbacks, and if you don’t pay attention, you may get stung. The other is they like spiders too. I like to have spiders because of what they eat. I had a problem with Black Widows in my last grow and killed twelve of them… I do not want those in my grow.
Basil
It does not matter what kind of basil you use; it all works well. The main reason I love basil is it increases terpenes and their production. Terpenes are what make the difference between good marijuana and quality top-shelf marijuana. That is the goal, high-end top-shelf Marijuana for you or to resell. This year, I am trying lemon basil to see if it boosts the terpene level.
Basil also keeps insects out of your grow like aphids, mosquitoes, and asparagus beetles. Asparagus beetles will eat and damage everything from leaves to stalks to buds. I hate them almost as bad as stink bugs. They are fast, small, and therefore hard to see; they will either drop when you try and get them or fly away to return when you are gone.
What not to plant as a companion plant? I am going to keep this list short. It’s pretty simple Marigolds. Yes, they kill root-knot nematodes, but the fragrance of the marigold makes the marijuana taste like marigolds. I know this because years ago a friend of mine planted some marigolds next to his Marijuana. He had a great crop, but you could not smoke it because it smoked harsh as marigolds smelled.
Remember, the grass is not greener on the other side of the fence; if it is, it probably has nitrogen toxicity.
SOIL Health = Plant Health
I have decided to go in-depth on the soil. If you follow these suggestions, you are going to create the best soil for cannabis. While I am not writing a book on the topic, I feel there is a need to cover as much as I can in a shortened format. I have read that over the years, America has lost anywhere from six inches to two feet of topsoil since Europeans arrived. And, while I am not a tree hugger by any means, I do believe that conserving our resources and soil is one of the most important. Without good soil we don’t eat; that simple. My Grandfather was a sharecropper after he got out of the Army after WW1. My father grew up during the Great Depression and Dust Bowl, so I have heard the horror stories of how the land died in front of you.
When growing anything in soil, not all dirt is not created equal. For example, my brother lives near the New Madrid fault in Missouri. Read on for those who do not know what the New Madrid fault is and what caused it. The New Madrid fault happened from three earthquakes between December 1811 and February 1812. They were so powerful they shifted the course of the Mississippi River from one to two miles, and the Mississippi flowed backward at times. I share this because when the river shifted, it dried out in those areas and created very fertile farmland.
The farmland in this area is $15000 plus an acre if you can buy it. I have seen what it produces, a good year a 100 bushels of soybeans per acre, and here maybe 60 bushels an acre. This time of year, soybeans are 18 inches to maybe two feet high here and in that area, it’s at least three feet tall. According to my brother, all the farmers do there is crop rotation. Where I live, good farmland is $5000 an acre all day long, and there is a lot of it for sale.
So with just a few examples, you can realize the difference good soil makes in growing good crops. I am not suggesting you run out and buy land and try to improve it, but I want you to look at how to make top-grade living soil for your marijuana.
Before you start researching the genetics of strains and put a single seed in the ground, you need to have your soil ready to go. You want to make the best soil for cannabis possible; without it, you will not have the dense big buds you want dripping with trichomes.
Creating great soil takes three to four seasons to get it to where it should be. You can make good soil in a season, far better than any pre-made bag products. Anything you craft or make yourself is superior to what you can buy, in my opinion. It would be best if you also remembered my growing environment is going to be different than yours, and by making your soil, you make it for your growing environment.
You can make decent soil in a year. In year two, it’s even better, and by year three, you will have the best soil around. So, is it a short cut not really but by your third growing season, you are going to have living soil that no commercial product can compare to.
That is a bold statement, but it’s true, and it all starts with dirt. Does it matter what dirt you use? Yes and no. You have to use what is available unless money is no object to you. A ten-ton dump truck of fair soil (it’s about half clay) costs $300, compared to mushroom compost which is one cubic yard for $50. There are thirty-seven cubic yards in ten tons, so the cost for mushroom compost for the same amount of dirt is $1850; that is a huge price difference, not to mention you will still need to add amendments to the compost. Always remember to feed the root feed the fruit. That is why making the best soil for cannabis you can is critical.
Building Cannabis Soil From Scratch
I started my soil mixture with a ten-ton truckload of dirt. Because my soil has a large percentage of clay, I used perlite to help break up the soil and aerate it. If you have a more sandy soil mixture, you need to use vermiculite as it retains better than perlite. The main difference between the two is the length of water retention time. You will use 2 cubic feet of either for a 25-gallon grow bag.
The next thing to use for your formula is peat moss;,it makes no difference what brand; find the cheapest you can buy because you need 1 cubic yard for a 25-gallon grow bag. By this time, you’re probably thinking too much drainage. I assure you it’s not, this soil started with 50% clay. You would rather have too much drainage than not enough; think of root rot for soil that retains too much water. Peat moss, when first mixed into the soil, makes it very acidic, but the high levels dissipate in a week. Just one reason to start your soil before your growing season starts.
Your next ingredient is sand, yes, just sand. If you do not have access to sand, the bags of play sand at any big box hardware store will work just five shovels full for a 25-gallon grow bag.
The next ingredient is hardwood ash; you apply this at the rate of two shovelfuls per 25-gallon grow bag. I have a fireplace, so I save all my ash. I burn zero plastic or similar items in my fireplace. If you do not have access to hardwood ash, you can substitute hardwood charcoal ground up finely… this will significantly add to your cost. However, if you are growing for just you, it’s worth it.
Your last major ingredient is aqueous diatomaceous earth. You need three shovel fulls per twenty-five-gallon grow bag. I have not found this cheap online, the best place I have found it is at Tractor Supply; $ 38 for a 40-pound bag, and it works great. The plant absorbs the silica, helping to create pest resistance and stronger stalks. This enables you to grow bigger buds and plants. Bigger plants equal higher yields.
If you are going to grow more than ten twenty-five-gallon bags, do your back a favor with a cement mixer, I use a small electric one for less than $250. It will mix three 25-gallon grow bags at a time, but I only mix enough dirt for two at a time, I do not want to overwork it. For 10 twenty-five-gallon bags or less, you can mix in a wheelbarrow, kids pool, or a tarp.
Testing Your Soil To Make Sure It’s Good
So at this point do you have super soil? The answer is no. Do you even have good soil? Who knows, you have to test it to ensure it’s what you want. The main thing you want is fluffy soil that allows for rapid root growth and does not retain water for too long. One of the steps is to do a perk test. A perc test is simply putting your mix into a container like a flower pot with 3 holes in the bottom and filling the container to the top with water and seeing how fast it drains. A good perc rate is one to thirty minutes per inch of water. One inch per hour is too slow and thirty inches per hour is too fast. My happy place is 15 minutes per inch.
So before you call it good on your soil mix, please take a batch and do your perk test. I know you do not want to do double work because this is exactly what I had to do. OK, let’s say you have the soil where you want it by the perk test. Is it time to finish mixing up all your soil? No. You still have a few more steps to complete; the first is what I call the squeeze test. You simply take a handful of your mix and squeeze it gently in your hand. When you release your pressure, does it fall apart? If so it is perfect on the density; if it stays in a clump, you need more sand,
perlite, or peat moss. So go back and add one of those. You have to do the perc test again and the squeeze test again. If you change one component of the mix, it changes them all.
The other component of the squeeze test is the smell test; this one is straightforward… does it smell like the woods? You want that deep loamy smell. I can’t describe it well, but you want it to smell like the woods after a rain. You have to add more peat moss and charcoal or hardwood ash if it does not.
The cost for me to make living soil is $10 for a 25-gallon grow bag filled to 4 to 6 inches from the top. The cost of using the best commercial soil, in my opinion, is $120. That soil, by the way, is Sohom, in my opinion. I have friends that grow just for themselves; they all have medical marijuana cards, so it’s legal, most grow indoors, and my plants are healthier, stronger, and smell better. The reason is not me being an Übermensch grower. It’s because I put the work in and make the best soil I can. Believe me, if I can do it, so can you. If you follow these suggestions, you will have the best soil for cannabis.
Be ready for part two on how to have the best soil for cannabis after one season, sorry no shortcuts.
Cannabis Soil Part 2
Now that you have made some of your soil for your grow. You should feel proud of your accomplishment. Few people take this step in creating the best soil for cannabis. Be assured the hard work is over, and now it is time to fine-tune the soil. Please remember that the amounts are all based on a 25-gallon grow bag. If you have a different size grow bag, you need to do the math to get the correct amounts of amendments used. If you live in a hot, humid area like Oklahoma, I will encourage adding four tablespoons of wettable sulfur to the soil. Sulfur adds to marijuana’s ability to tolerate hot and humid climates. More is not better with sulfur or most micronutrients. Simply take the sulfur into the bag with your hand as far down as you are able; the reason you use your hand is to make sure that any possible chunks are broken up.
Your soil is almost ready for planting. You can plant in it and it will be fantastic soil, but it is not the best soil for cannabis. The next step is to make it living soil, and that takes time. I do not care what people trying to sell you living soil say. It is not living soil if it was mixed recently. Yes it will have the components to be living soil, but it has not had the time to develop the full microbe profile. All living things take time to mature, develop and grow. Please don’t buy into the hype; and when you make the best soil for cannabis it takes time.
Living soil is like good whiskey or fine wine; with the right conditions it gets better with age. When you take these final steps, you have started the path to creating the best living soil for cannabis. It takes one grow season to have great soil, and I will explain why.
I let my soil set for a week before I start these next steps. During this week, I don’t just let it set; I water it just as I would if it had a mature marijuana plant in it. You do this to start the process of breaking down everything in the soil, and it also starts the process of the beneficial bacteria and fungi growing.
Many companies promise great results from using their products, and I have tried some, and most of what they say are empty promises. I rely on my marijuana crop for extra cash. I also love growing, so it does two things for me. So what I tell you works; you can read the reviews, read what I say, and see the pictures, then judge for yourself. I exclusively use Dr. Jimz products and here is why, it’s a veteran-owned company, everything they make is done right here in the US, all the ingredients they use come from the US, and last but not least, they work incredibly well.
Use Dr. JimZ® Products For Better Weed!
I use four products, 321 grow, tabs, Chicken Soup for Marijuana, Tomato Secret, and Bloom Kaboom. If you want the absolute best big, dense buds with full flavor and dripping with trichomes, I suggest you do the same. I have not found anything that works better.
So your first step is to take the 321 grow tabs and crush them up. I add six crushed grow tabs per twenty-five-gallon grow bag. Work them in as you did with the sulfur. This will inoculate the grow bag with Mycorrhizal Fungi. The reason you want it to work in the fungi is to spread throughout the bag, and more surface area is inoculated so it will spread faster.
The next step is to take two ounces of Chicken soup for marijuana per gallon of water. Yes I realize Dr. Jimz says one ounce per gallon, but what we are doing is inoculating or bags for the first growing season. You have to water the grow bag until the bottom of the grow bag turns a darker color. This indicates the bag is saturated with water. The Fungi have to have moisture and food to grow and reproduce. Remember we are making a colony that is well distributed through your grow bag.
I then use Tomato Secret as a top dressing for the next step. I take one handful and sprinkle it on top of the soil. I am looking for a thin layer 1/8 to ¼ inch deep on top. I don’t measure the depth but you can tell what is right. It’s ok. To see some dirt through the top dressing, but you want to see more top dressing than you do dirt. You want to continue to water the grow bags with the two ounces of Dr. Jimz Chicken Soup for Marijuana per gallon until it’s time to plant. DO NOT LET THE BAGS DRY OUT COMPLETELY. If you do, it’s back to square one. One week before planting time I cut back on the water inoculation. I want the soil damp somewhat on the dry side, not wet before I start planting. At this point your soil is better than any you can buy, that is unless you have a ton of money, even then the soil is not like what you make, the main reason is the soil from your area is adapted to your micro clime over thousands of years, and nothing in a bag is going to do that.
When you plant (you do this same step with starting seeds or transplanting young plants) is, take two 321 grow tabs per gallon of water and water in the seeds or the plants. You know your water solution is right if it is an opaque greenish-brown solution.
What To Expect With Your Grow
Now just relax and walk your planting daily to see how each bag looks. You may wonder why you do this; each bag is going to be different, why? Each soil mixture is going to be slightly different; each bag is different, some bags are going to get more sun, some less, same thing with sunlight and wind.
Think of each grow bag as a separate ecosystem, because they are. Don’t start trying to tweak the bags not until you harvest your plants. What you are mainly looking for is how much water retention or loss from each bag occurs, there is always going to be a difference. This way you know what bags require more or less water.
If you planted seeds they will pop in a week to ten days, some as early as three or four. Keep track of this and record what strains pop the first. When you transplant young marijuana plants they are going to be droppy the next day, so do worry about it. It is a completely natural process. In my experience plant your immature marijuana plants when they are between twelve and eighteen inches tall. Smaller they have a tendency to become wind burnt and larger the transplant shock takes longer to recover.
Once this is done, the magic starts taking place, the Mycorrhizal Fungi start to spread throughout the bag, and the marijuana plant’s roots are growing, well, like a weed.
When they meet is when the science of growing start to take place. The Mycorrhizal Fungi and other beneficial bacteria form a symbiotic relationship with the roots of your marijuana plant. This is overlooked by growers. This process makes sure the marijuana plants up take the proper nutrients in the correct amount. There is no product on the market that makes this happen. You have made this happen by creating the best super soil for your marijuana. Be proud of yourself for doing so, because not many are willing to make this commitment to marijuana.
Ongoing Cannabis Soil Mainenance
For the ongoing soil, inoculation feed one ounce of Dr. Jimz Chicken Soup For Marijuana for the soil per gallon of water every two weeks, and apply Tomato Secret every two weeks. A tip for doing this is to apply your top dressing first, then water it in. It would be best if you did this for the entire vegetation cycle.
When your plants flip, it is time to add Bloom Kaboom to your feeding schedule. I use the Bloom Kaboom on the weeks I don’t use the Tomato Secret or Chicken Soup for Marijuana. The next step is very important for the continued development of the best soil for marijuana you have gone through the process of making. When you cut the plant, leave the stalk nub and rootball in until it’s time to work the bag next season. The roots break down completely, adding all the beneficial fungi and bacteria back into the soil. When I pull the stalks, I find the stalk the rootball has completely broken down and is absorbed by the soil. For next season you want to start feeding the grow bag as soon as the daily temperatures exceed 40 degrees F. The application rate is one ounce of Chicken Soup for Marijuana per one gallon of water. For a twenty-five-gallon grow bag, I apply one gallon a week. This helps the bacteria and fungi get a jump start for the upcoming growing season.
Are your plants stiff or limp?
Get your mind out of the gutter, but remember, stiff is always better than limp for many things. However, we are discussing your girls. The proper word for what makes a stiff plant is called Turgor. Sometimes if conditions are right, your plants droop in the afternoon, even if you have watered them correctly in the early morning. Nothing to worry about as long as you have watered correctly; the plant will recover when the temperature cools. This is one of the components of producing high-quality big buds.
This process is called transpiration. Transpiration is the moisture escaping through the stomata, or pores, in plant leaves. Think how you sweat; plants sweat as well. However, it is called transpiration when it comes to plants. This is how plants keep cool. Plants mainly wilt during high temperatures because their evaporation exceeds the rate at which they can uptake water. A plant regulates the transpiration rate according to its water requirements and the weather.
Plants droop for reasons other than hot weather. The main ones are over-watering and under-watering. People think if the top of the soil is dry, the plant is under-watered. I used to think the same thing. Sometimes it is, but most of the time it is not. That is why it is so important to invest in a moister meter. For some reason, the super soil formula I use and suggest you make forms a crust on the top few inches. That is certainly a bonus, that was unexpected. I think it is the DE and hardwood ash in the mixture. When you test below the crust with a moisture meter, the soil moisture is perfect most of the time. It takes thirty seconds to check the moisture level, so you should take the time and do it. Checking soil moisture is so essential. In the heat of the summer, I water twice a day. I start at 5:00 am and finish around 6:30 am. I want to ensure the plants are hydrated before the day’s heat. It also prevents the plants from getting burned by the magnification effect of water droplets when the sun hits them. I then go back and water at about 5:00 pm. Sometimes I go through 1000 gallons a day. I have an excellent well.
With the temperatures edging to right at 100 degrees, I am starting the early morning routine. I also installed a mister system on one row of plants. Why only one row? Well pretty simple. I was told by a veteran grower from Mendocino, California, that he uses a misting system on his grow with positive results. He says his plants soak up the water and produce dense buds. He grows 60 plants a year, and he has to chop them using an electric chainsaw. Is he telling me the truth? I tend to believe he is, but at the same time, I do not wish to risk my entire grow based on what someone says without seeing the results in person. So one row is going to be my testing platform. If it works, then I will expand it. Then I will test a foliar feeding system using a mister.
Right now the misting system is done manually. If it works, I will set it on a timer; I still have to work out the math on what the misting system output per hour. Under-watering is far better than over-watering. The simplest way to prevent over-watering is, you guessed it, a moisture meter. It is critical to water correctly. Proper watering ensures big healthy buds.
If you have never heard of it, Turgor is defined as the following: Turgor, pressure exerted by fluid in a plant cell. This pressure presses the cell membrane against the cell wall, making it stiff. Turgor is simply what makes a plant rigid. Loss of water pressure from plant cells causes flowers and leaves to wilt.
How Often To Water Cannabis
Turgor pressure is the force within the cell that pushes the plasma membrane against the cell wall. It is also called hydrostatic pressure and is defined as the pressure measured by a fluid, measured at a certain point within itself when at equilibrium. (source: Wikipedia)
Think blood pressure, proper blood flow in animals ensures that nutrients and oxygen are distributed throughout the body. Remember the mantra “feed the root, feed the fruit” in this case, your bud.
What it means in everyday English: Is your plant full or empty? You want your plant full all of the time. A full plant is a happy plant; it will give you the best yield. How do you tell if your plant (s) all have a full tummy and are happy? Pretty simple, if your plant (s) look droopy, they need food, and primarily that just means water if you built your soil as I suggested; however, if you did not build your soil, all is not lost. Dr. Jimz Chicken Soup for the Soil is perfect, 100% organic, and a little goes a long way. It also feeds the microbes in the soil, so your girls get every last bit of nutrition from the soil. This is unlike harsh chemical fertilizers that kill off those beneficial microbes.
The second step you want to do is put the top of the plant stalk between your ring and middle finger at the middle knuckle. Then slightly move the plant left and right. You only have to move the plant a couple of inches each way; if you feel resistance and it is stiff you have a happy plant!
A full and happy plant requires water. Proper watering is required to get the nutrients to all areas of your plants. The goal is to get as many nutrients to your buds as possible.
So how do you tell if your plant has enough water? Well, the first is to look at it. If It droops, guess what? It needs water. That is pretty self-explanatory. One popular method is to stick your index finger up to the knuckle and see if it’s damp. Not to be rude, but if you are doing it that way you are wrong.
Grow Bags, Deep Roots, and Cannabis
Another advantage of grow bags is seeing if you are watering deep enough. When the water reaches the bottom of the bag, it gets darker. When you see this, you know you have watered deep enough. Deep watering produces deep roots. Your goal, as far as the root system goes, is you want the grow bag filled with roots completely. When this is accomplished, you ensure the plant has the root system to produce big buds.
With Cannabis, you want deep roots, and three inches deep is not a good indication of the moisture level where most of your roots are or should be. With too much water, you get root rot too little water, and you stress your plant (s), and your yield and quality suffer. Save yourself the headache and a dirty index finger and buy a moisture meter. You can pick one up online for less than $10, including shipping. Please take my word for it; they are well worth it.
Every plant is going to be different when it comes to water and nutrients; I think we all would agree on that. That said, two gallons per plant is not a one-size-fits-all solution. You must use the stiff plant method and moisture meter to see how much water the plant needs. Once you get to know your plants, you can get close enough to how much water they need by touching them.
You do not want to get behind in your watering schedule. You have to remember it’s always better to under water than to over water. The goal is to produce big healthy, dense buds. If you overwater, it leads to root rot, and believe me, once the root rot becomes evident, it is almost impossible to correct it. I have not been able to turn them around. I have been told that ½ cup of hydrogen peroxide in a gallon of water will reverse the root rot. I have not tried it because the super soil is too important to kill off the good bacteria.
If you have not noticed, I am passionate about good living soil. In my journey of developing my techniques for growing great marijuana with big dense bus dripping with trichomes, I have read, watched videos, and talked to more experienced successful growers, then took this knowledge and developed it for my grow. I have concluded that marijuana is a weed that does not need much to produce. I have studied the methods used in Afghanistan, Morocco, and Lebanon. In those countries, they take seeds and just plant them. The plants get minimal watering (if any), certainly no supplemental nutrients, and zero pests or powdery mildew/fungal prevention.
We will continue to drill down on this topic in our following discussion, so stay tuned.
I use weed to get rid of the pain and if I never used weed I would probably go insane – Tupac
Till next time happy growing. Don’t panic it’s organic.
Also, Please ask questions… I would LOVE to help you any way I can 🙂